Understanding the costs to renovate a vintage Airstream and figuring out the sequence of work can be very daunting. Initially, I didn’t have those concerns at all – it’s easy to get swept up in the excitement of picking up your trailer on eBay or Craigslist and figuring that with a little clean up, you’ll be ready to start your adventures. I suppose that’s true to some extent. But, having taken this approach myself, it was months after I’d bought my first trailer that I’d gotten an idea of what goes into proper long-term restoration and maintenance – and it was much more than I’d bargained for. When I started hearing restoration figures that went into the tens, or even hundreds of thousands of dollars, I realized that determining whether Airstream ownership would be right for me required a bit more homework.

I started by looking and listening. I suggest taking your time, walking in and around your Airstream, getting to know it. Like fitting into a vintage leather jacket, appreciate its history, and start to make it your own. Clean it, and you’ll notice new details. Try using, opening and closing things. Observe where your trailer’s seen some wear and tear, or taken a few ‘love taps.’ Where has it been neglected? Seriously damaged? Where does the style suit you and where would you make some changes? What are things you’re capable of fixing and where do you need some help? Take notes. Take pictures. Better yet, do your homework first and learn how to properly inspect an Airstream before you buy!
There are many free or inexpensive resources to help with this. I visited Air Forums to read people’s experiences and have listened to hours and hours of The Vintage Airstream Podcast to learn anecdotally from the pro’s. If you have a trailer or are considering one and know its faults, you can make a few phone calls and start to get price quotations. These were resources that I used to inspect my own Airstream and start getting a sense of the costs to prepare for a cross-country trip and also for long-term ownership:
- Restoring a Dream: My Journey Restoring a Vintage Airstream by Tim Shephard
- The VAP Episode 62: Heading West (16:47 – 24:33)
- The VAP Episode 81: Trailer Economics ( – )
- The Newbie’s Guide to Airstreaming by Rich Luhr
- The (Nearly) Complete Guide to Airstream Maintenance by Rich Luhr
Next, you’ll get into cost estimating and project scheduling, which may sound scary, exciting, or boring, depending on your experience and temperament. If you’re not great at this, you might find an ally to help – whether it’s a co-owner, friend, or contractor whom you trust. The key is to be thorough and find a format that works for you. The basic questions always are:
- Is this the best travel / habitation solution for you?
- What are the most essential tasks to meet your immediate goal?
- What can wait for a later phase?
- What should you delegate, and what will you do yourself?
- Do you have – or, can you make – the amount of time and money required?
Over the last few years of vintage Airstream ownership, the answers to these questions haven’t always been clear to me. Some days they’re still not! But my personality is adventurous, and the green renovation process I’m embarking on serves a practical purpose as well as an educational one that relates to my career. It doesn’t hurt that for the last few years, I’ve been working as a construction project manager and have been studying green building and interior design. Here’s how to replicate some of the things that project managers do, to get a handle on your own renovation project:
- Get comfortable with Microsoft Excel. You might try using a template, or look at comparable home renovation budgets to create your own.
- Download a copy of CSI Master Format, a list of construction categories (several of which will apply and many which will not) to help organize your budget.
- Use your notes and photos of the Airstream to start categorizing the repairs.
- Study, ask questions of the Airstream community, visit shops, talk with professional restorers and read product reviews. Compile a list of tasks, tools, and materials for each repair, adding the costs to your budget.
- Get quotes in writing if possible. Otherwise, request rough estimates to get a sense of your costs. Bookmark links to online resources.
- Don’t forget to ask how long repairs will take to complete, and find out when a service provider can fit the work into their schedule. If you’re a DIY’er, assume tasks will take 50% longer than you think. Be careful – sometimes DIY is a false economy!
- Be patient, persistent and thorough, understanding that for quite a while, your budget will be a ‘living’ document that changes as you gather more and more information.
- Making comparisons to get the best value means evaluating both cost and quality. Make sure you’re comparing “apples to apples” when evaluating products & services. Buy quality or expect to buy it twice.
- No matter how endless it may seem, trust that the more information you gather, the clearer a picture you’re getting of the situation. Remind yourself that you want to know when work turns out to be more involved or expensive than you first anticipate, so that you can re-prioritize and make important decisions. Fixing big issues with band-aids means you’re throwing away money delaying the inevitable instead of dealing with reality head-on and arresting a problem before it escalates. Or, it means you want to superficially update a trailer for a short time and plan to flip it.
- Understand that in construction, there are “change orders,” usually additions to (but occasionally subtractions from) the scope of work, that come up after you think you’ve finalized your budget and schedule. This usually results in unanticipated costs. You can help minimize these by doing more homework up front, or soften the blow by setting aside a certain percentage of the total budget for miscellaneous / unplanned costs.
- Round up calculations in your budget to give yourself a bit of a buffer. Don’t forget tax, shipping and labor costs.
- Double-check your math and that you’ve instructed Excel to calculate the way you want it to.
- When working with service providers, in certain cases it’s worth it to consider making down payments, progress payments or perhaps temporarily withholding final payments (10% for example), as incentives for them to start, continue and finish bigger tasks in a timely fashion. If applicable, discuss these terms with your contractor in advance.
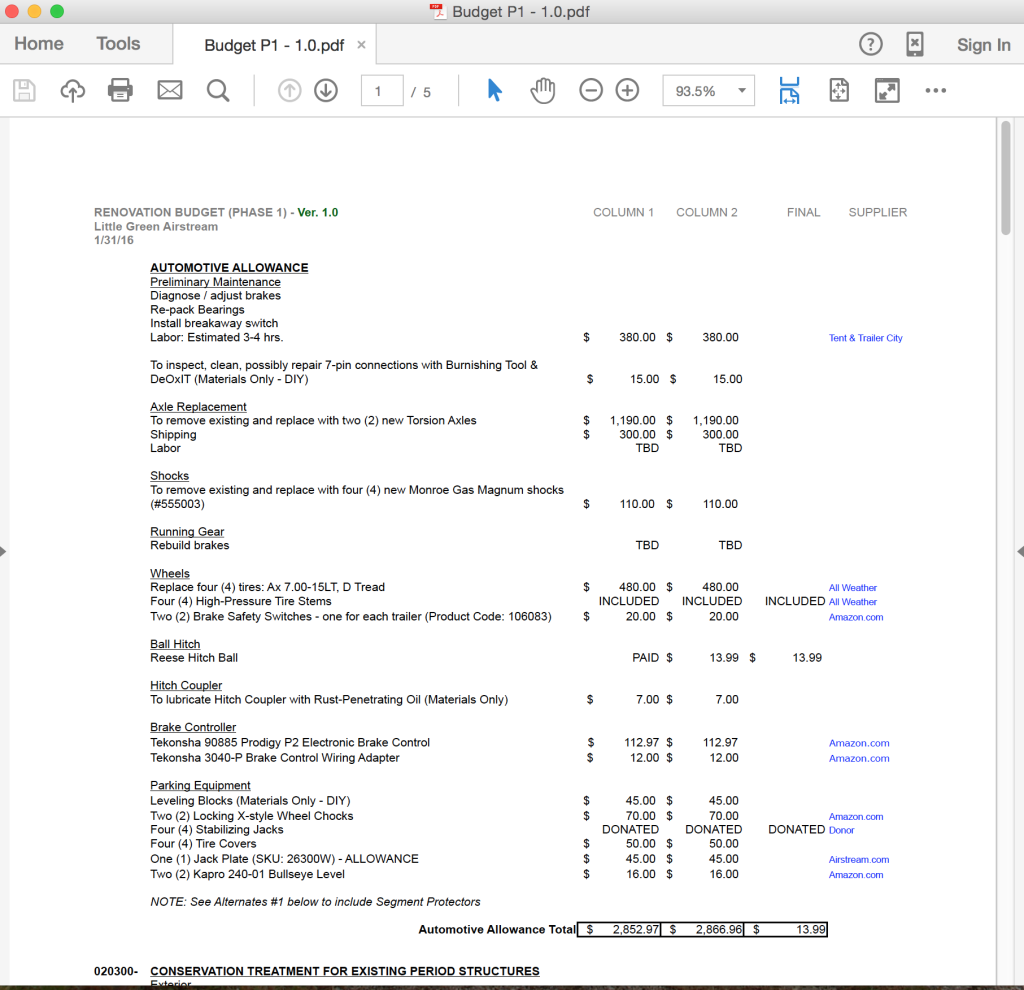
As promised, here is a link to the first draft budget for Phase 1 of my little, green Airstream renovation. My goal for this phase is to have the trailer be basically habitable (indoor plumbing and use of propane may have to wait), comfortable, and safe & sound for a cross-country trip. I’ll do basic maintenance also. Possible longer term renovations like a shell-off sub-floor replacement will have to wait for a future Phase. This budget is a first draft, because I’ll need to bring the trailer to a specialist to assess certain things. Please note that several of the costs are estimates that need to be confirmed. In addition to the descriptions, there are three price columns to be aware of:
Column 1: Values in this column indicate what I expect to pay, from today forward, for goods & services for this phase. This column lets me know how much money I need to raise.
Column 2: Values in this column indicate what I expect to pay moving forward, but also includes costs for things I’ve already paid for. These are my current and projected total costs.
Final: Items that have already been paid in full. This column lets me know how much I have already spent.
If you have any questions, let me know – I’ll be happy to answer them!
Up next: Preparing a Renovation Schedule for your Vintage Airstream

